3D Angels
Take your Christmas tree decorations to the next level by making them three dimensional!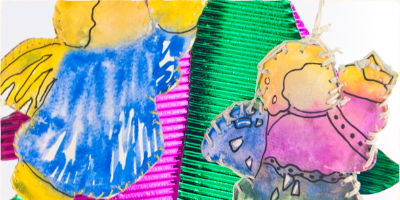
Total: $0.00
Take your Christmas tree decorations to the next level by making them three dimensional!
Get your supplies!
You will need:
Stay Anywhere Permanent Pens- Pack 12 Micador
Micador Stylist Watercolours
Achiever Round - FSC Pure
Rains Watercolour Paper
Scissors

Step 1: Getting your template!
Using the template provided, trace your design onto the Roymac Rains paper. From the Rains Pad 230x310mm you should get 8 angels per sheet.

Step 2: Angels!
To make one angel, you will need to cut out two angels. If you want to make four angels, cut out eight.

Step 3: Colour!
Using the paint and some water, paint the angels. You can make them as bright and beautiful as you want.

Step 4: Bring her to life!
Paint the angel’s dress, hair, star, wings and feet. Make sure the brush is loaded well with colour because it may dry lighter than how it appears when it is wet.

Step 5: Drying time!
Once painted, let the angels dry.

Step 6: Details!
Using a Stay Anywhere Permanent Marker, add details if desired or outline the angel and her dress. This will help the designs to stand out.

Step 7: Start Sewing!
When the paint is dry, take some strong needles and cotton or string and start sewing from the top of the angel’s head down towards the feet.

Step 8: Fun Stuff!
Once near the feet, start to fill the angel with tissue and continue sewing around the angel’s body.

Step 9: Check the progress!
When ¾ of the angel is sewn, check to see if the angel needs more or less stuffing, then finish the angel, sewing all around the outside.

Step 10: Holy Moly!
Once back at the starting point, make a loop with the thread so the angel can be hung from her head on a Christmas tree.
false