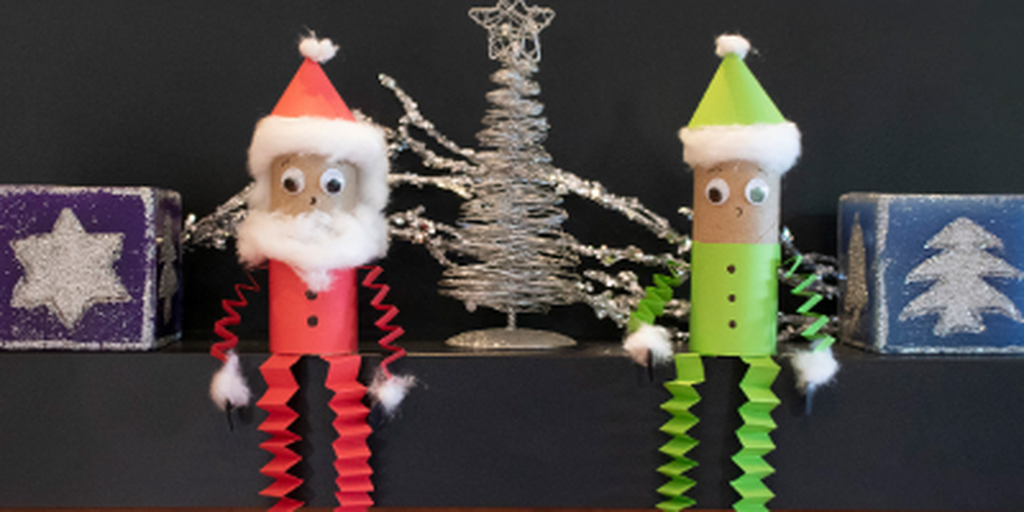
Christmas Cardboard Roll Characters
Create some cute Christmas characters with recycled cardboard rolls and coloured paper!
Total: $0.00
Create some cute Christmas characters with recycled cardboard rolls and coloured paper!
Get your supplies!
You will need:
Cardboard rolls
Micador jR. Create It Art Pad – Colourfun
Micador jR. Safe Scissors
Micador early stART Glue Stick, Card 2
Black paper
Cotton balls
Googly eyes
Ruler

Step 1: Cut!
Before you start creating your characters you will need to prepare some paper. Each character will need a piece for the body, hat, arms, legs, boots and mittens. Cut a piece that is 50x150mm for the body, this will cover about half the roll. Cut 2 strips that are the entire length of an A4 page for the legs - measuring 15mm wide. Cut another of these strips that is 10mm wide for the arms. One strip will be enough to create both arms. Use a circular object like a tape roll to cut out two circles for the hat, ours measure about 90mm across. Remove a quarter piece from these circles. Lastly, cut out some mittens and boots from a blank piece of paper for your characters.

Step 2: Fold!
For each leg strip of paper, fold the paper back and forth to create a long zig zag. For the arms, cut the strip in half and then zig zag fold it. The one strip will create two arms! Next, overlap the circular hat pieces to create a point at one end. Make sure the open end is a similar size to the cardboard roll opening, and then glue the paper together. Lastly, wrap the body pieces around each cardboard roll and glue the paper together where it overlaps.

Step 3: Glue!
Time to start assembling our characters! Glue the boots and the mittens to one end of each arm and leg piece. At the other end of the zig zagging paper, apply glue and attach it to the cardboard roll. Attach the legs at the base of the roll and the arms at the sides.

Step 4: Add Details!
Using the glue and cotton balls, create Santa’s beard and add white fluff to the hat, mittens and boots. The best way to do this is to apply glue straight to the cardboard roll and then wrap the cotton balls around it. You’ll find that most cotton balls will easily unroll if handled gently, which makes it easier to wrap around the roll. Pull off little pieces of the cotton to add at the base of the mittens, boots and at the top of the hats. Allow to dry and add any other details such as googly eyes and buttons. Now it’s time to place these guys on display!
false